Aysha Monticone


In the fast-paced and demanding world we live in, finding moments of stillness and calm can be challenging. In an attempt to find a little peace...
If you want to get your gut in order, Dr Will Bulsiewicz is the expert to help you sort out fact from fiction. This is the gut-health cheat sheet...
Simple but sensational, this crispy roast veg stuffing tray will be your new go-to, whether as part of a festive spread, a base for an abundant...
Having a handful of these tasty avocado fries will leave you with no regrets.
If the dish your heart desires isn’t already vegan, a dash of love and a sprinkle of creativity can make it so!
Fake the bake with this delicious, decadent cake made with raw, whole ingredients.
Feast your eyes as well as your taste buds on this beautiful rice noodle salad starring crunchy snow peas, sweet honeydew melon, and refreshing...
This recipe from Tully’z Kitchen is your ticket to the ultimate authentic creamy vegan butter chicken curry – nutritious, flavoursome, and...
Spraying sheets and pillows with calming scents can be a wonderful aid to slumber
The next time you go for a walk, discover the wonder of the everyday world around you
A skincare routine can be a way to nourish yourself inside and out
When the clouds converge, practise gratitude for the smallest of glimmers, and learn to dance in the rain.
Bring the art of traditional food preparation to your kitchen with this simple and enjoyable process. You’ll create healthy, nutritious foods that bring a myriad of health benefits.
We all know the amazing benefits of including fermented foods into our daily diet; however, what we often don’t realise is how easy and inexpensive it is to make them ourselves.
Fermented foods such as sauerkraut and kimchi have become a staple in my home; we include it on the side of most meals as it’s so delicious and healthy. Originally, I was buying premade kraut but this became quite expensive, so I started to look into making it myself. I soon realised that there were so many benefits to making my own sauerkraut and kimchi.
Sauerkraut, for example, basically consists of cabbage, salt and a few fresh herbs and spices. So, the ingredients are easy to find and inexpensive. What I love most about homemade sauerkraut is that you can source your own locally grown organic vegetables, ensuring your kraut is made from the highest quality ingredients. Unfortunately, some store-brought brands of sauerkraut contain preservatives as well as sugar. They can also be pasteurised which essentially kills the good healthy bacteria that you’re looking to get out of fermented foods.

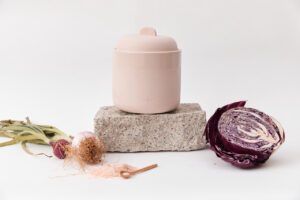
Fermentation pot with sauerkraut ingredients: Kinfolk & Co
I began my fermentation journey using a glass jar, but I quickly switched to a fermentation pot as I found the results to be far more consistent and the process easier. Fermentation pots have been used for centuries in various cultures due to their simple yet effective design. They are ceramic vessels that have a water seal at the top, which creates an anaerobic environment perfect for good bacteria to grow. Weights are also used in these pots to keep the cabbage submerged while it ferments. They ensure nothing can enter the vessel while the food is fermenting due to the water moat while also creating the perfect temperature and dark environment for the process.
To make sauerkraut in a fermentation pot all you need is cabbage, salt and whatever herbs or spices you like. A couple of my favourite combinations are: fresh dill and lemon, garlic and cumin seed, and juniper berry and bay leaf. The key to making amazing kraut is to massage the cabbage with salt really well. I use a wooden tamper and a large bowl for this purpose. Use the tamper and your hands to massage the salt and the cabbage until all the juice of the cabbage is released. This juice is then used to cover the cabbage to ensure no mould or nasties grow while it ferments.
![]()
Red cabbage in mixing bowl: Samantha Woods
***
If you’re ready to discover the joys of fermenting at home, Aysha’s beginners’ sauerkraut recipe is a great place to start. She steps through the process using simple traditional ingredients, with instructions both with and without a fermentation pot. Although there are several stages, and a bit of patience required, the active time is minimal and the rewards are worth the wait!
Lead image: Molishka on Shutterstock
If you want to get your gut in order, Dr Will Bulsiewicz is the expert to help you sort out fact from fiction. This is the gut-health cheat sheet...
In the fast-paced and demanding world we live in, finding moments of stillness and calm can be challenging. In an attempt to find a little peace...
Spraying sheets and pillows with calming scents can be a wonderful aid to slumber
The next time you go for a walk, discover the wonder of the everyday world around you
A skincare routine can be a way to nourish yourself inside and out
When the clouds converge, practise gratitude for the smallest of glimmers, and learn to dance in the rain.
Discover the art of fermented foods with this simple and effective sauerkraut recipe.